Naptime Crafters Pattern Testing

I tested this cute pattern from Naptime Crafters.  It is the Ashley, and I loved it.  Alaire loves it too, but she didn't like posing for pictures while daddy started carving pumpkins : (  It came together very quickly and the instructions were awesome!  I will definitely use this one over and over.  


Cropped Pillowcase Top and JEGGINGS!!!

We are heading to South Dakota to visit family.  It has been in the high 80's in St Louis and now it is going to be in the 40's at our destination!!! I have been stitching up a storm on Alaire's summer clothes the last few weeks and of course  I wanted her to wear some of her new clothes, but I had to be realistic.  So what better than a pair of toddler jeggings to go with a Short Pillowcase Dress.  The dress will be so cute this summer with bloomers showing, but not so much when there is a bit of snow on the ground where we are heading!   We made the 12 hour jaunt North and Alaire found herself at home right away!


Aaannnd I AM alive ; )

It has been nothing shy of crazy around here.  I feel like every time I have something to post I think of ten other things I should post first, and this is when the procrastination begins.  It is one of my biggest flaws.  Anyway, I have a lot of fun things to share and I will be getting to them sooner than later.  I have actually been sewing like crazy.  My Internet tutorial list grows every single day.  I am sure many of you can relate. I also have a few new purchases (nothing big and ridiculous) that I can't wait to post about because they have made some recent projects quicker and more enjoyable!!!! I hope everyone is enjoying this spring!  I can't believe how fast April has come and gone!  See you soon!


All photos are now of her running from me : )  

Pintucked Baby Bonnet-Tutorial


Hello!!  I am Anna from BumbleBaybees.blogspot.com.  First, I want to say thank you to Tam for asking me to post with her for "Baby" week of Crafting with the Stars!  Today we are making  a "Pintucked Bonnet."  It is simple and sweet and would be perfect for the upcoming Easter season.  It would also be a great to use for baptism.  

Supplies:
Fabric of Choice ( I used Muslin)
Iron on Stabilizer
Lace
Ribbon
Doily
Sewing machine and thread

Cut List:
14.5"x 8.5"out of fabric
14.5"x 7" out of fabric and stabilizer
(This is for a small baby. Add one inch to the 14.5 for a medium and two inches for a large, which is what I used on my one year old in the pictures.)

Markings:
On the larger strip of fabric mark a line 2.5", 3.5" and 4.5" up from the bottom.  These will be your guides for the tucking.

Cut your two strips of material.  Iron the stabilizer onto the backside of the smaller strip, which is your bonnet's lining.

Fold the fabric on one of the lines you just marked, and press.

Using a 1/4" inseam stitch all the way across  and then press the material back out.  Repeat for two other tucks.
Next pin on your lace 1/4" up from the bottom of the main piece.

1/4" revealed 

My ribbon will be strung through the lace, so I will be making two stitches.  One on the top and bottom edges of the lace, so that the ribbon will be able to be laced through.

And Stitch it!

Slip ribbon through your lace and cut it off at each end, so there is no overhang.

Cut two pieces of ribbon for the ties.  I cut mine about 12" long.  You can always cut them down when you are finished so longer is better.  Pin the ribbon on top of the laced ribbon, right sides together.

Pin your lace back to expose the seam allowance.


Place the liner piece, with right sides together, on top of main piece.  Make sure your ribbons and lace are not in the seam allowance.  Stitch on three sides using a 1/4" inseam. (in picture the left right and bottom sides)

Clip bottom corners, turn right side out and press.

Press 1/4" to make seam and turn inward.

Find exact center and place a pin there. (At this point you can make a 1/4" stitch across the back, but I didn't)
Pin a scallop of the doily on the center pin.


Then begin to add scallops from each side and pin down.


Pin all the way around until you reach the last scallop

Inside view.

Flip it inside out and sew 1/4" away from the edge.
Place on baby's head and enjoy!


Crafting With the Stars Round 3: Baby

I am posting at Sew Dang Cute Crafts today.  I am the guest blogger for Round 3 of Crafting with the Stars.  The theme is "Baby"  Head over and check it out along with all of the other projects for Crafting with the Stars.

"Lace and Shine" Valentine's Hoodie and Yoga Pant Tutorial

 Hello!  I hope you are having a great Tuesday.  I am having one of those days where it has been a good day but super unproductive. I guess we all deserve those once in a while.  I was super tired today when I got up so I decided that I would take the advice so many people have given me, but I have never done  rarely done... NAP WHEN YOUR KIDS NAP!  We fell asleep at 9:30am with me thinking 30 minutes and I will be good to go.  

Guess what time I woke up?  
12:30pm.  
Yes, that is 3 hours.  
Yes it is unheard of.  
Yes it was awesome.  
But no, nothing got done at this house today!


Anyway, enough about that and on to what you want...
Warning:  Professional photographers and models were not in this $10 budget, so bear with us.


I have a fun and EASY tutorial for you all today.  Instant gratification! 
(That's the world we live in right?)

I bought these two materials in the remnants at Jo Ann, pretty gaudy and pretty awesome.

I used my Silhouette to cut out freezer paper hearts.  You can also just cut out hearts from the material or freezer paper by hand.
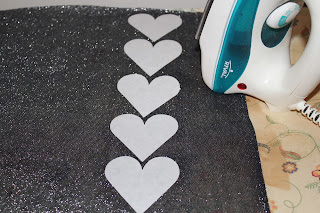
I then ironed them onto the back of the two fabrics and cut them out.  
I bought the hoodie above and the pants below at Wal-Mart for $10.  You could also use a set you have at home.

I then pinned the hearts on the clothes and played
around with the placement that I liked best.

Here is another one I liked, but remember sleeves and pant legs this little without
stitching by hand are kind of a pain to do.


My new BFF!  (It comes in a handful of brands.  I just get the cheapest.  Good coupon item!)
I seriously try to find ways to use this now because it is sooooo awesome.
It washes out, so if you make a mistake no big deal!.    I love it for this project because it is faster than Wonder Under and it requires no pinning for sewing these bitty hearts on.

After you have decided on a layout, remove all layers of hearts except the base layer.  Then spray the back of the heart with the glue and apply. (This is the first layer after applique, but you get the idea)

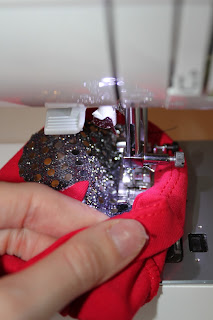
You are going to zig-zag or satin stitch around the whole heart.  Use a small stitch width and length.
 Take your time on the curves.
If you are doing pants make sure not to sew through both sides.  Get the needle in and then roll up the back side of the cuff as shown.  Check often that you aren't sewing both sides.. experience talking : )

Here is the finished pant leg.

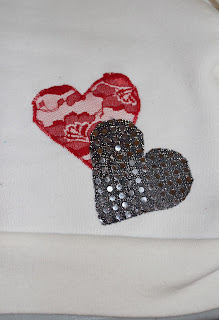
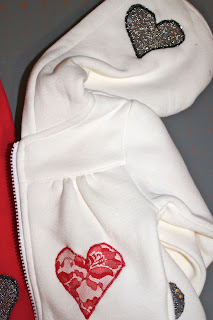
On the hoodie I put multiple layers of hearts, so after the lace one was finished I glued the sequined one on and then stitched around it.
If you are wondering, I did use two different thread colors ... yes even on the bobbin.  Look how cute it looks peaking through the inside of the hoodie.
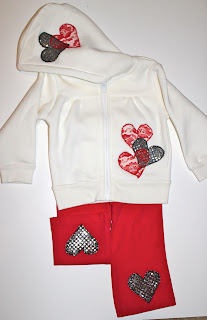
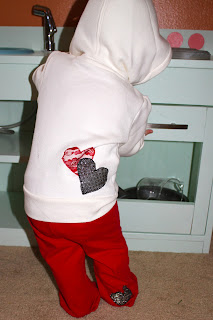
Finished product.
 Cute.  Simple.  Easy.
My model trying to escape.  I wish I had an after picture of that little yellow
candle there on the right in her hands.  Of course she popped the wick off and tried to eat it!
Why wouldn't she do that in a white shirt?